k8s环境部署(一)
k8s环境部署(一) - 过去都是浮云 - 博客园 (cnblogs.com)
环境介绍
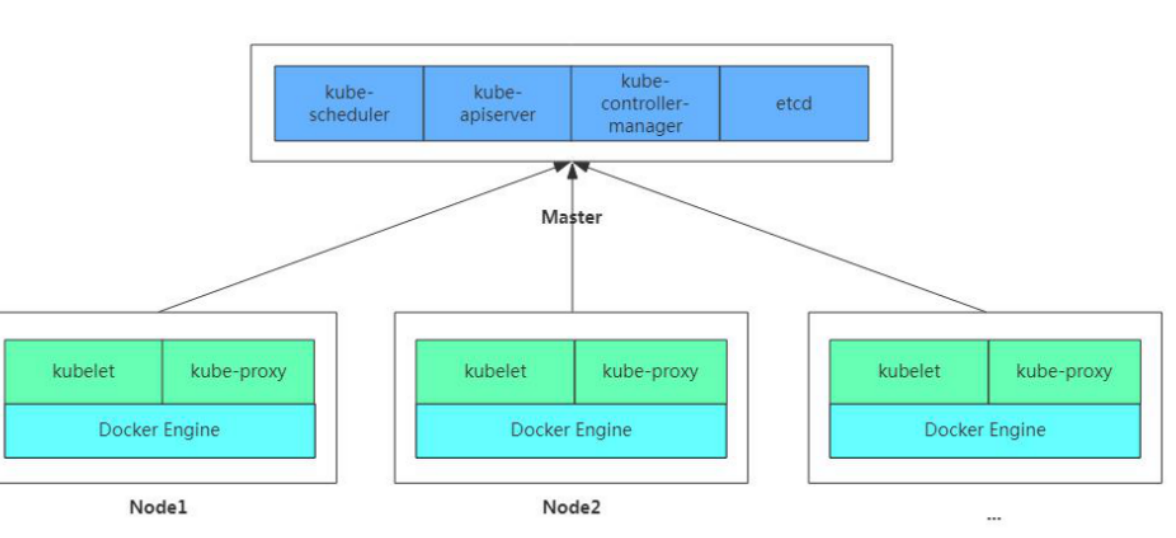
1.单masrer节点 (安装下面图中介绍的四个组件)
2.俩个node节点(安装kubelet和docker)
3.为了支持master与node之前的通信,我们还需要在master上安装flannel来实现maste与node之间的网络通信
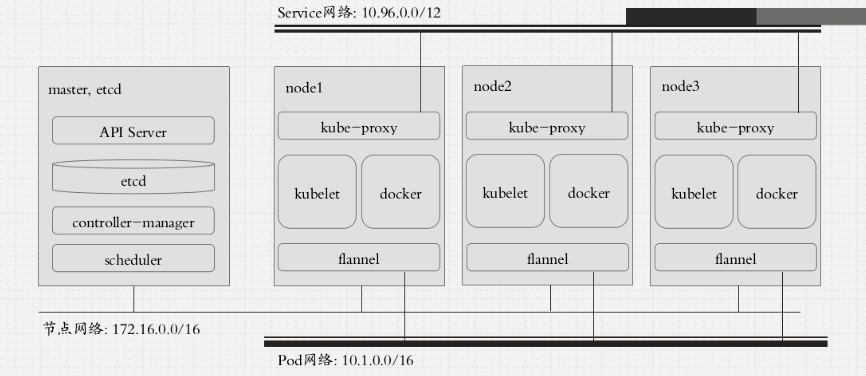
这里建议通过yum来安装,手动安装需要网络规划和证书安装,后期可以自己研究下
安装要求:
系统版本:CentOS7.x版本
硬件配置:内存2GB以上 cpu2核以上 硬盘大于30G
集群网络配置:集群中所有服务器内网必须互通,并且需要访问外网来拉取镜像
禁用swap分区
学习环境:
学习目标:
1.在所有节点安装Docker和kubeadm
2.部署kubernetes Master
3.部署容器网络插件
4.部署kubernetes node,并将节点添加到kubernetes集群
5.部署dashboard web页面,可视化kubernetes资源
================================================
k8s基础环境操作:
关闭防火墙:
$ systemctl stop firewalld
$ systemctl disable firewalld
关闭selinux:
$ sed -i 's/enforcing/disabled/' /etc/selinux/config
$ setenforce 0
关闭swap分许
临时关闭:swapoff -a
永久关闭:注释掉/etc/fstab文件中的swap行
编辑hosts文件,将所有节点的ip和主机名一一对应
172.16.204.130 k8s-master
172.16.204.131 k8s-node1
172.16.204.132 k8s-node2
将桥接的IPv4流量传递到iptables的链
$ cat > /etc/sysctl.d/k8s.conf << EOF
net.bridge.bridge-nf-call-ip6tables = 1
net.bridge.bridge-nf-call-iptables = 1
EOF
$ sysctl --system
开启IP转发功能
echo "1" > /proc/sys/net/ipv4/ip_forward
NTP时间服务同步 *****
=================================================
所有节点安装docker、kubeadm、kubelet
安装docker
#卸载旧版本docker

[root@localhost ~]#  yum remove docker docker-common docker-selinux docker-engine

安装必要的一些系统工具

#yum-utils提供yum的配置管理

#device-mapper-persistent-data 与 lvm2 是devicemapper存储驱动所需要的

[root@localhost ~]#  yum install -y yum-utils device-mapper-persistent-data lvm2

配置Docker的稳定版本仓库

[root@localhost ~]#  yum-config-manager --add-repo https://download.docker.com/linux/centos/docker-ce.repo

更新安装包索引

[root@localhost ~]#  yum makecache fast

安装Docker CE

 [root@localhost ~]#  yum -y install docker-ce-18.06.1.ce-3.el7
$ systemctl enable docker && systemctl start docker
$ docker --version
Docker version 18.06.1-ce, build e68fc7a
添加阿里云YUM软件源
$ vim /etc/yum.repos.d/kubernetes.repo
[Kubernetes]
name=Kubernetes
baseurl=https://mirrors.aliyun.com/kubernetes/yum/repos/kubernetes-el7-x86_64
enabled=1
gpgcheck=1
repo_gpgcheck=1
gpgkey=https://mirrors.aliyun.com/kubernetes/yum/doc/yum-key.gpg https://mirrors.aliyun.com/kubernetes/yum/doc/rpm-package-key.gpg
yum clean all
yum makecache
安装kubeadm,kubelet和kubectl
由于版本更新频繁,这里指定版本号部署:
$ yum install -y kubelet-1.15.0 kubeadm-1.15.0 kubectl-1.15.0
$ systemctl enable kubelet
=========================================================================
部署Kubernetes Master
$ kubeadm init \
--apiserver-advertise-address=172.16.204.130 \ #master组件监听的api地址,这里写masterIP地址即可或者多网卡选择另一个IP地址
--image-repository registry.aliyuncs.com/google_containers \
--kubernetes-version v1.15.0 \
--service-cidr=10.1.0.0/16 \
--pod-network-cidr=10.244.0.0/16
|
1
2
3
4
5
6
7
8
9
10
11
12
13
14
15
16
17
18
19
20
|
[bootstrap-token] Creating the "cluster-info" ConfigMap in the "kube-public" namespace[addons] Applied essential addon: CoreDNS[addons] Applied essential addon: kube-proxyYour Kubernetes control-plane has initialized successfully!To start using your cluster, you need to run the following as a regular user: mkdir -p $HOME/.kube sudo cp -i /etc/kubernetes/admin.conf $HOME/.kube/config sudo chown $(id -u):$(id -g) $HOME/.kube/configYou should now deploy a pod network to the cluster.Run "kubectl apply -f [podnetwork].yaml" with one of the options listed at: https://kubernetes.io/docs/concepts/cluster-administration/addons/Then you can join any number of worker nodes by running the following on each as root:kubeadm join 172.16.204.130:6443 --token 44basl.nx5l92iyq91a1fjw \--discovery-token-ca-cert-hash sha256:2b317de2bc21973b245ceaa6570352172a16a6a4ac59a47fb7ef82bc036bb120 #此koken有效期为一天,如果tokey过期,可以使用如下命令<br>生成永久不过期的tokey:kubeadm token create --ttl 0 --print-join-command<br>#kubeadm join 172.16.204.130:6443 --token 65xvux.v693lnz6ts7pm030 --discovery-token-ca-cert-hash sha256:2b317de2bc21973b245ceaa6570352172a16a6a4ac59a47fb7ef82bc036bb120 |
===========================================================
配置常规用户如何使用kubectl访问集群
 mkdir -p $HOME/.kube
  sudo cp -i /etc/kubernetes/admin.conf $HOME/.kube/config
  sudo chown $(id -u):$(id -g) $HOME/.kube/config
master安装Flannel
kubectl apply -f https://raw.githubusercontent.com/coreos/flannel/master/Documentation/kube-flannel.yml
查看所有pod
|
1
2
3
4
5
6
7
8
9
10
|
[root@k8s-master ~]# kubectl get pod -n kube-systemNAME READY STATUS RESTARTS AGEcoredns-bccdc95cf-6tx8r 1/1 Running 0 52mcoredns-bccdc95cf-l7lv9 1/1 Running 0 52metcd-k8s-master 1/1 Running 0 51mkube-apiserver-k8s-master 1/1 Running 0 51mkube-controller-manager-k8s-master 1/1 Running 0 51mkube-flannel-ds-amd64-sx7r9 1/1 Running 0 16mkube-proxy-xb6cc 1/1 Running 0 52mkube-scheduler-k8s-master 1/1 Running 0 51m |
查看节点
|
1
2
3
|
[root@k8s-master ~]# kubectl get nodeNAME STATUS ROLES AGE VERSIONk8s-master Ready master 53m v1.15.0 |
加入node节点
在node节点上执行加入集群的命令
|
1
|
kubeadm join 172.16.204.130:6443 --token 44basl.nx5l92iyq91a1fjw --discovery-token-ca-cert-hash sha256:2b317de2bc21973b245ceaa6570352172a16a6a4ac59a47fb7ef82bc<br>036bb120 |
查看node1节点加入是否成功
在node1上执行docker ps 查看k8s组件是否已安装

在master上执行kubectl get nodes 查看节点信息

==========================================================================================================
部署 Dashboard

安装Dashboard
kubectl apply -f kubernetes-dashboard.yaml
使用master节点ip地址+端口来访问,协议是https的
查看Dashboard端口信息:kubectl --namespace=kube-system get service kubernetes-dashboard

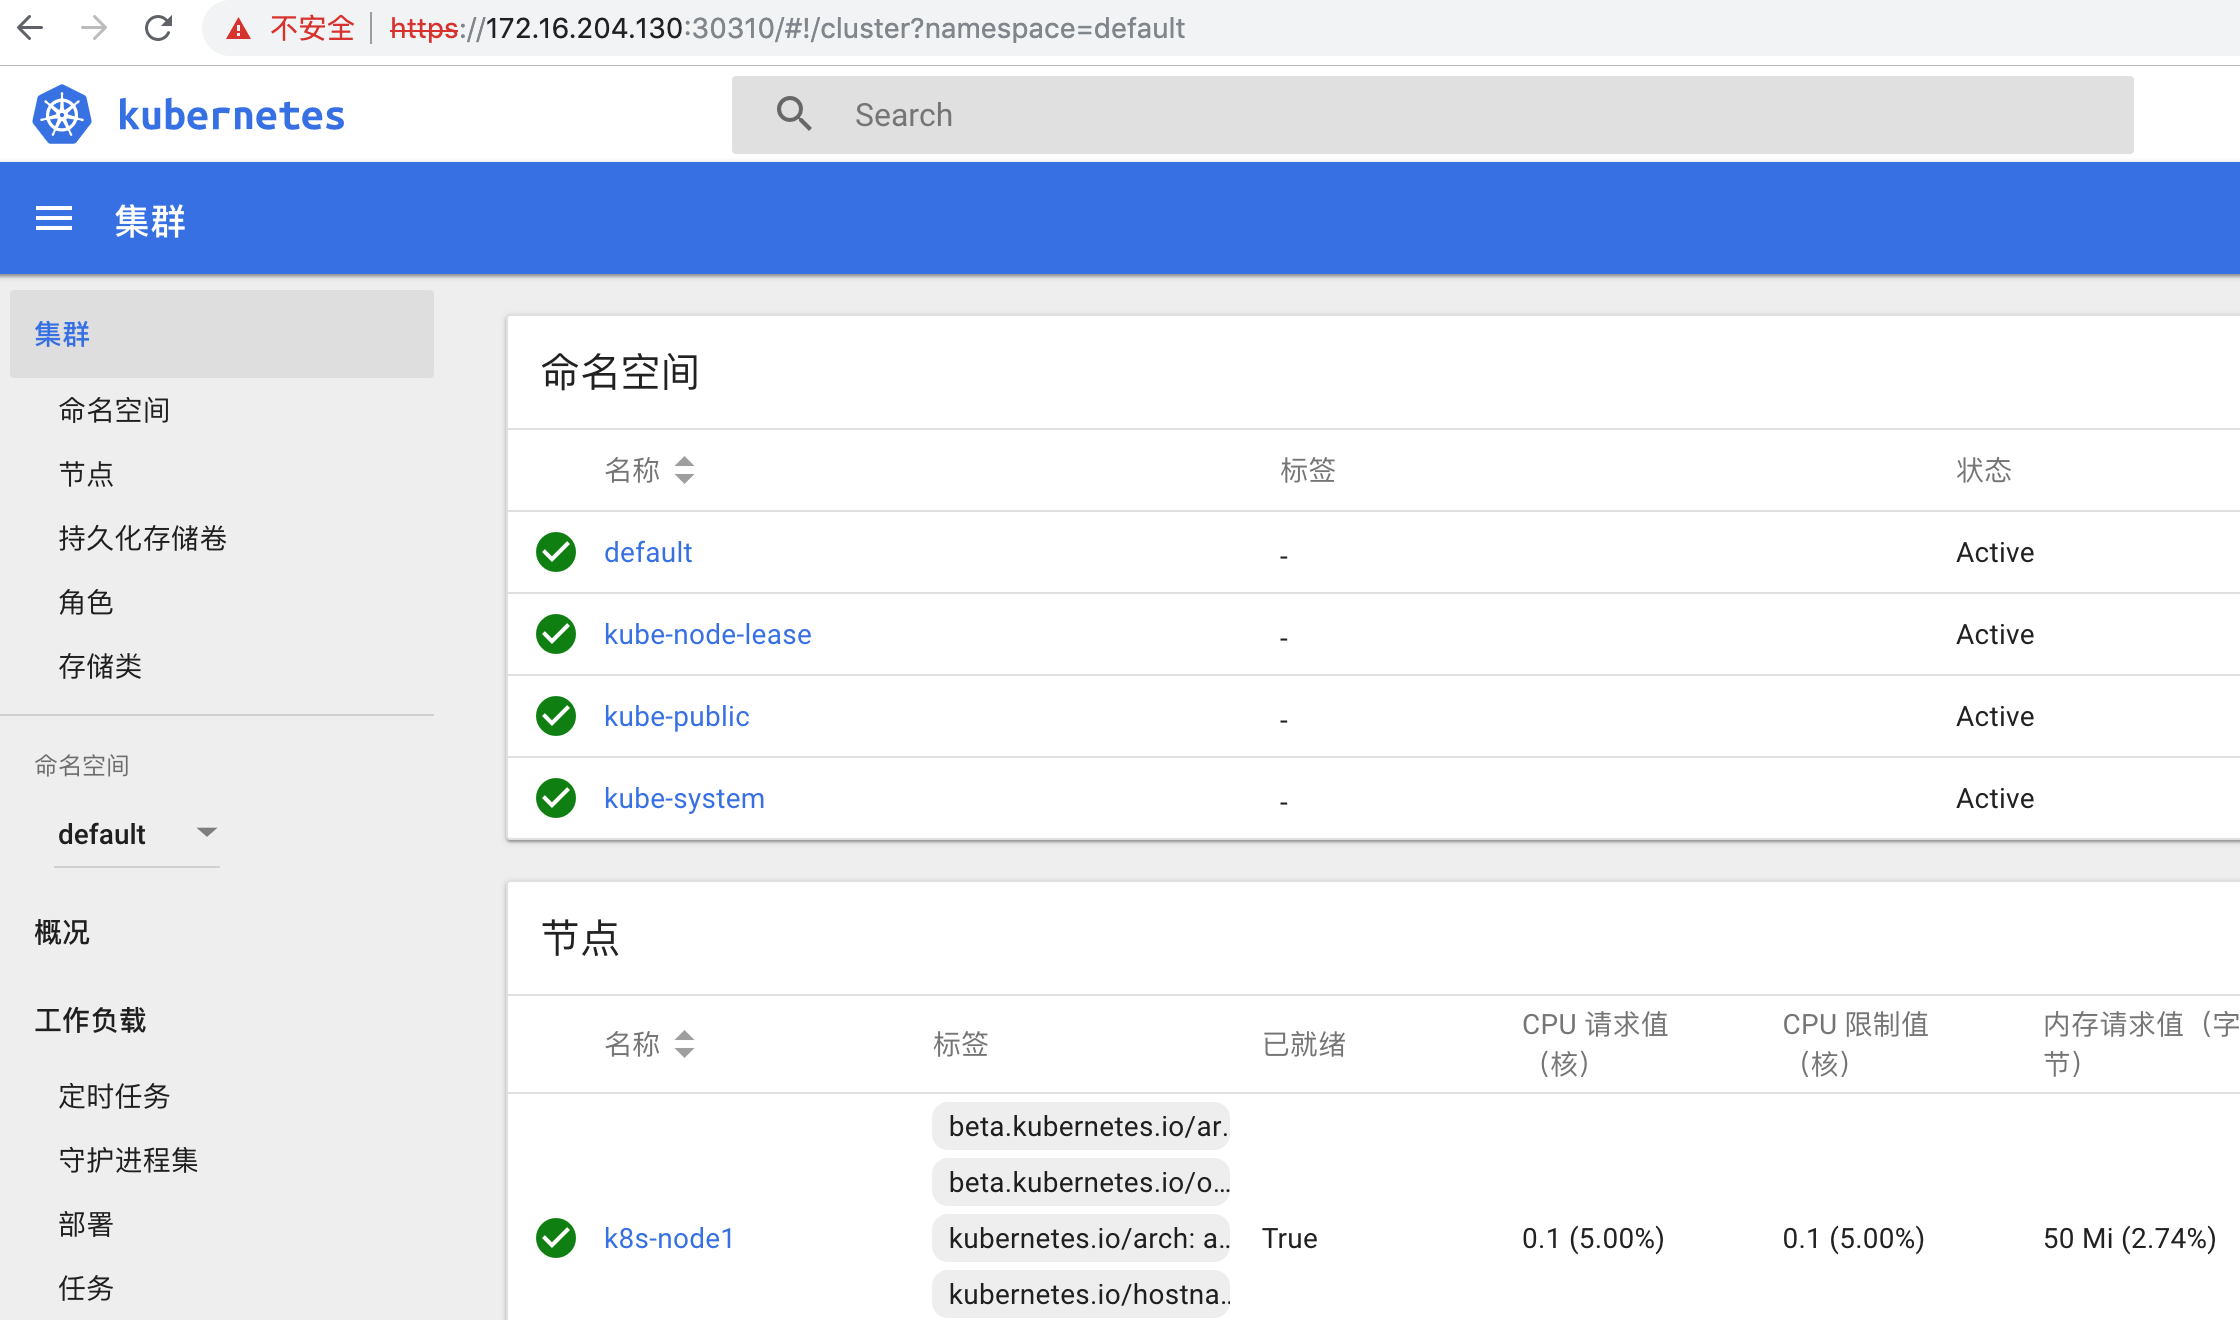
以我自己的服务器为访问对象,使用https://172.16.204.130:30310即可访问
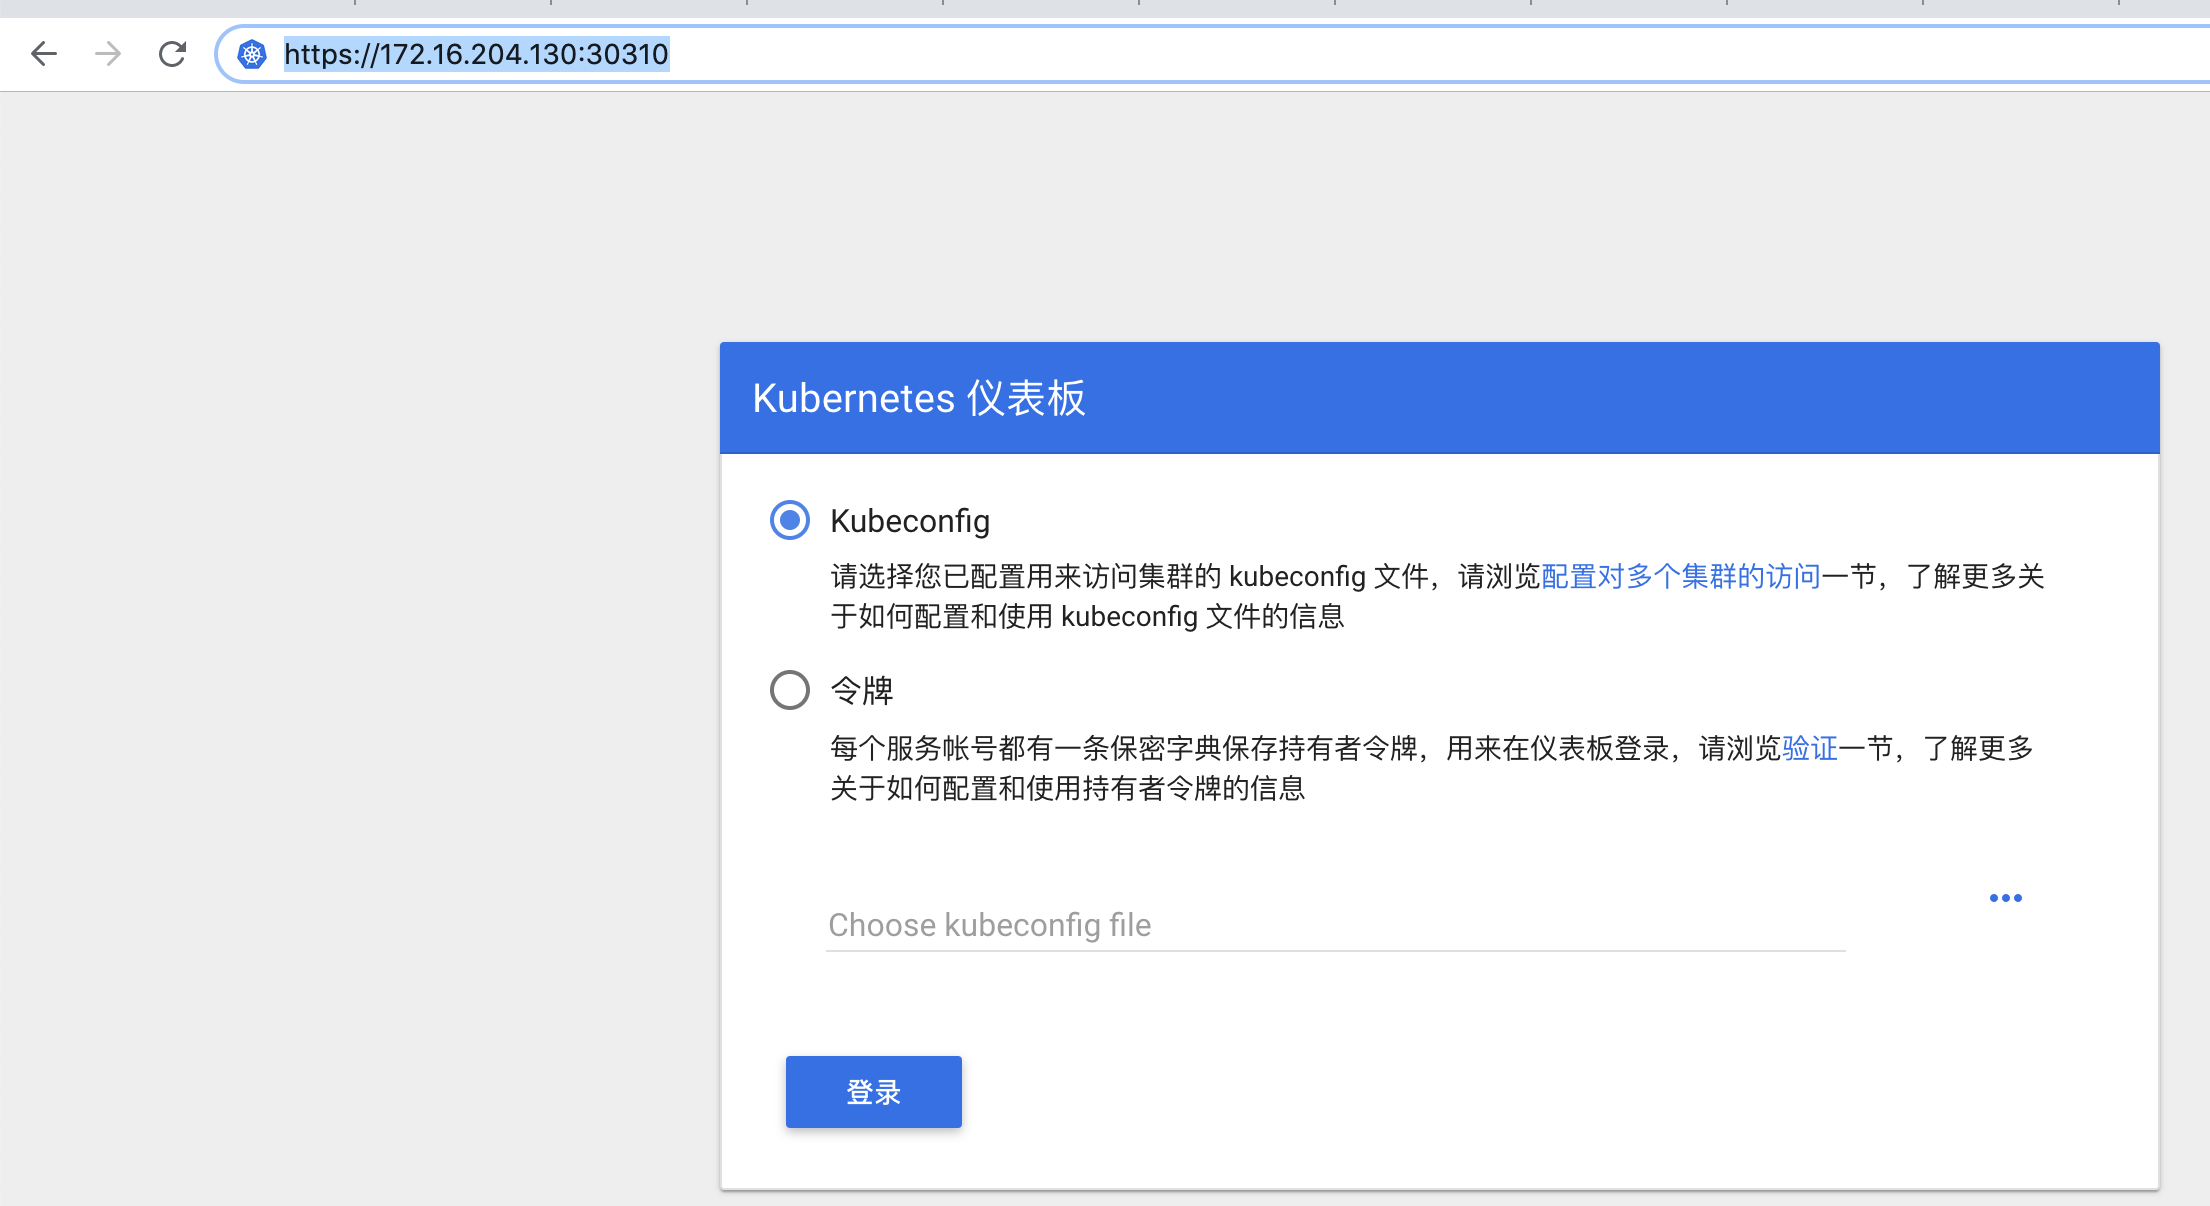
登陆方式分为俩种:
1.kubeconfig
2.token
在master上执行
kubectl create serviceaccount dashboard-admin -n kube-system
kubectl create clusterrolebinding dashboard-admin --clusterrole=cluster-admin --serviceaccount=kube-system:dashboard-admin
kubectl get secret -n kube-system #查看token
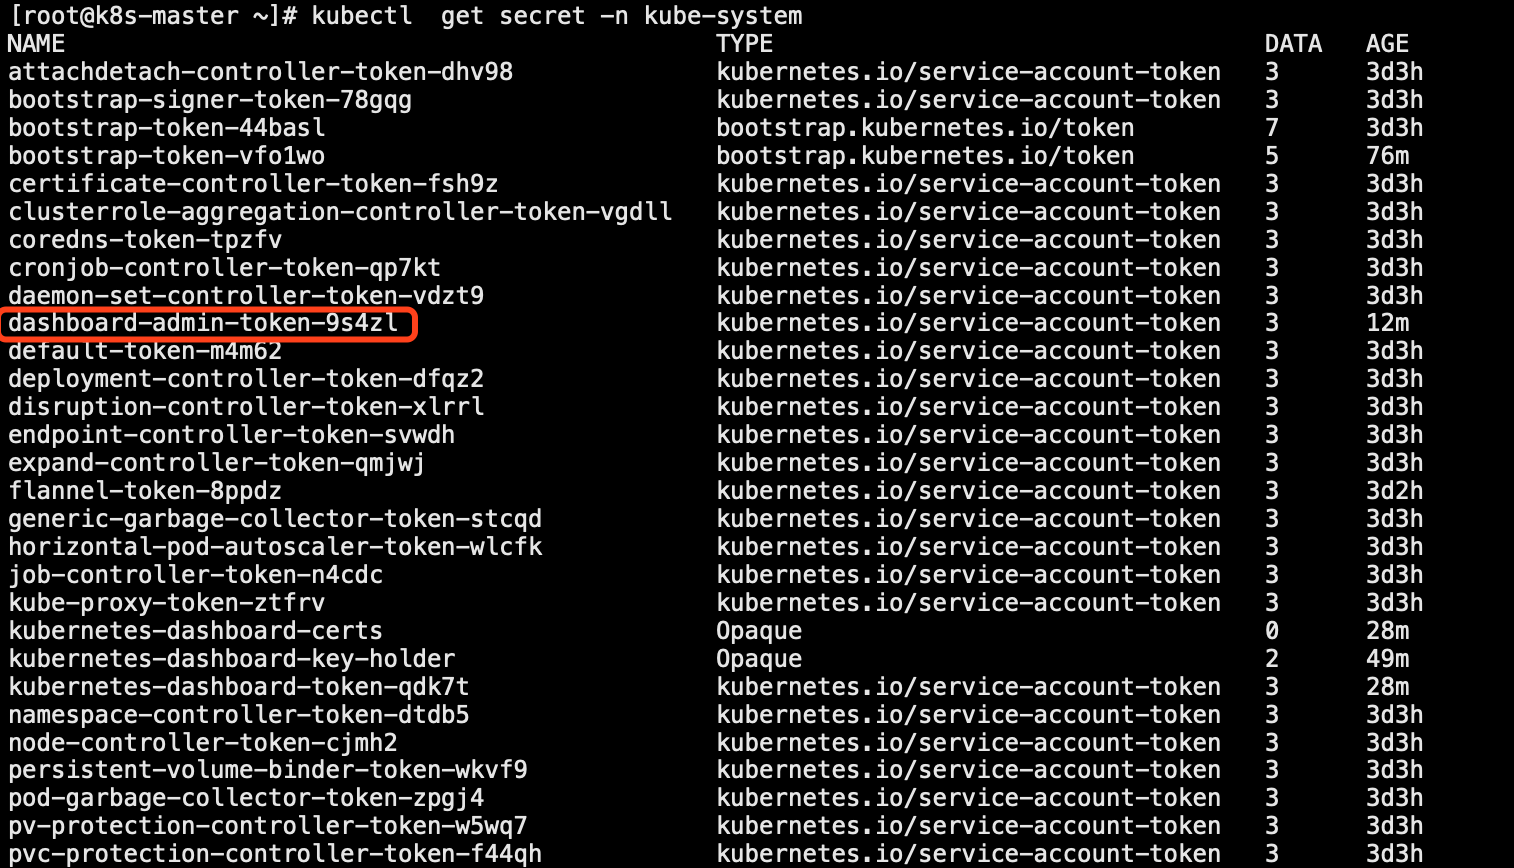
查看token的具体信息
kubectl describe secret dashboard-admin-token-9s4zl -n kube-system

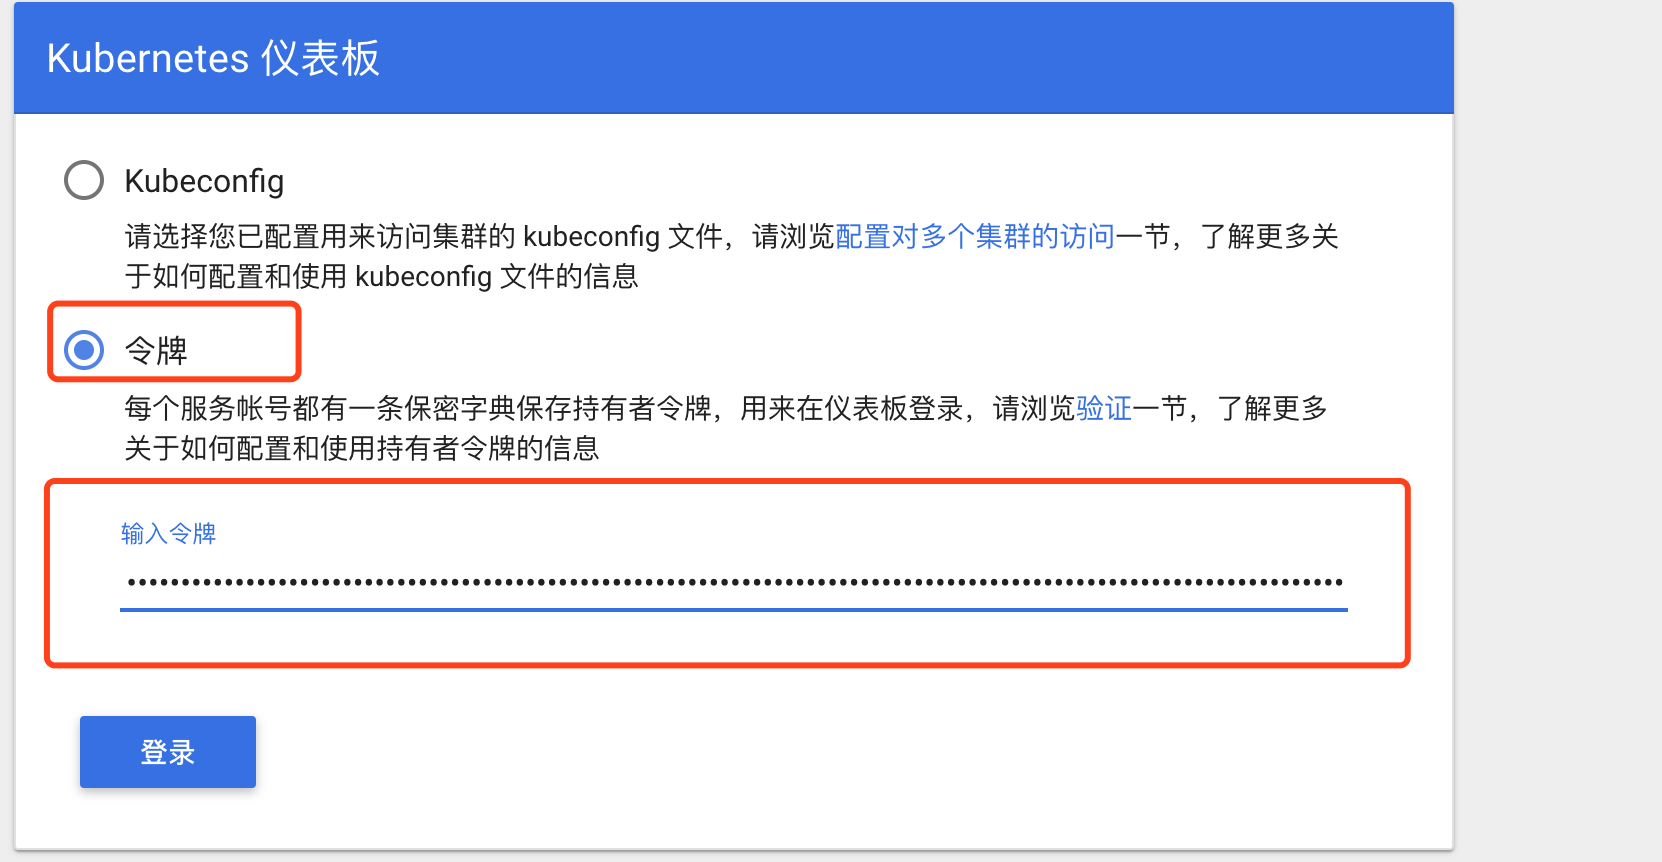
登陆成功的页面:
***dashboard无法访问排查
1.查看dashboard被k8s分配到了哪一台机器上
[root@k8s-master log]# kubectl get pods --all-namespaces -o wide
NAMESPACE     NAME                                    READY   STATUS    RESTARTS   AGE     IP               NODE         NOMINATED NODE   READINESS GATES
kube-system   coredns-bccdc95cf-6tx8r                 1/1     Running   3          3d14h   10.244.0.7       k8s-master   <none>           <none>
kube-system   coredns-bccdc95cf-l7lv9                 1/1     Running   3          3d14h   10.244.0.6       k8s-master   <none>           <none>
kube-system   etcd-k8s-master                         1/1     Running   2          3d14h   172.16.204.130   k8s-master   <none>           <none>
kube-system   kube-apiserver-k8s-master               1/1     Running   2          3d14h   172.16.204.130   k8s-master   <none>           <none>
kube-system   kube-controller-manager-k8s-master      1/1     Running   2          3d14h   172.16.204.130   k8s-master   <none>           <none>
kube-system   kube-flannel-ds-amd64-qqglk             1/1     Running   2          11h     172.16.204.132   k8s-node2    <none>           <none>
kube-system   kube-flannel-ds-amd64-sx7r9             1/1     Running   3          3d13h   172.16.204.130   k8s-master   <none>           <none>
kube-system   kube-flannel-ds-amd64-sxt6x             1/1     Running   0          12h     172.16.204.131   k8s-node1    <none>           <none>
kube-system   kube-proxy-h8mdt                        1/1     Running   0          12h     172.16.204.131   k8s-node1    <none>           <none>
kube-system   kube-proxy-jjdjp                        1/1     Running   2          11h     172.16.204.132   k8s-node2    <none>           <none>
kube-system   kube-proxy-xb6cc                        1/1     Running   2          3d14h   172.16.204.130   k8s-master   <none>           <none>
kube-system   kube-scheduler-k8s-master               1/1     Running   2          3d14h   172.16.204.130   k8s-master   <none>           <none>
kube-system   kubernetes-dashboard-5dc4c54b55-nkrrs   1/1     Running   0          11h     10.244.1.5       k8s-node1    <none>           <none>
2.查看dashboard的集群内部IP
[root@k8s-master log]# kubectl get services --all-namespaces
NAMESPACE     NAME                   TYPE        CLUSTER-IP     EXTERNAL-IP   PORT(S)                  AGE
default       kubernetes             ClusterIP   10.1.0.1       <none>        443/TCP                  3d14h
kube-system   kube-dns               ClusterIP   10.1.0.10      <none>        53/UDP,53/TCP,9153/TCP   3d14h
kube-system   kubernetes-dashboard   NodePort    10.1.179.144   <none>        443:30310/TCP            11h
3.通过curl集群IP来确认访问是否正常
[root@k8s-master log]# curl -I -k https://10.1.179.144
HTTP/1.1 200 OK
Accept-Ranges: bytes
Cache-Control: no-store
Content-Length: 990
Content-Type: text/html; charset=utf-8
Last-Modified: Mon, 17 Dec 2018 09:04:43 GMT
Date: Tue, 23 Jul 2019 22:21:21 GMT
4.如果访问出现被防火墙拦截
vim /etc/systemd/system/multi-user.target.wants/docker.service
#在server字段中添加
ExecStartPost=/sbin/iptables -I FORWARD -s 0.0.0.0/0 -j ACCEPT
#重启docker服务
systemctl daemon-reload
systemctl  restart docker
